skip to main |
skip to sidebar

Joomla Video Tutorial
Joomla Tutorial
Joomla Video Tutorial
Beginner tutorial for running a Joomla! website hosted at www.mlds-networks.com. Learn how to add sections, categories, and items. How to use the menus and login
Joomla Tutorial: Working With Templates
In this Joomla tutorial I go over how to install and apply different templates to your Joomla website.
How to add a menu item in Joomla 1.5 - www.ijoomla.com – how to add a menu item in Joomla 1.5 video tutorial

How To Install Joomla! Through cPannel
Joomla! is the most popular Open Source CMS in the world. Welcome to the world of Joomla!
*Joomla Training Video of the week!
How to change the HEADER image in your Joomla template. Upload the new header image using FTP.
*Installing Joomla
*Installing Joomla
How to install Joomla using a hosted application provider.
*The Mass Email Component
Joomla's Mass Email component allows you to send an email to everyone who is registered on your site.
SEE Joomla! VIDEO
Build a Joomla Website
You are about to experience the easiest and fastest way to learn Joomla. Newcomers to Joomla typically find that it takes weeks or even months to learn, but our beginner course has been carefully designed to teach you how to get a complete Joomla site installed and running in just a few hours. And best of all, it's free! Online video tutorials are the best way to learn Joomla because each step is demonstrated, right in front of you. And if you happen to miss something the first time, you can just watch the video again. So start learning now for free and learn Joomla in a fraction of the normal time by clicking the button below.
How to prevent Joomla form spam
How to install a Joomla template

Joomla 1.5 installs with three pre-installed templates. These templates are good as a starting point when learning Joomla. Still, if you want to create a Joomla website, you will want to look at other templates as well.
There are a lot of templates out there. Both free and commercial. I usually recommend spending a few dollars on a template from a professional provider if you're creating a business website. You will get those dollars back in less frustrations, better search engine rankings and easier customization. The support is also better (not always, though).
This tutorial will show you how to install a Joomla template and how to get started
customizing it.
Downloading the Joomla template
Joomla templates are provided as ZIP files.
Download the file from the provider, but don't unzip the file before installing.
Installing the Joomla template
To install the Joomla template, follow this procedure:
1. Log in to your Joomla administrator
2. Click the top menu link 'Extensions' -> 'Install/uninstall'
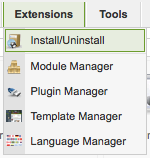
3. Under 'Upload Package File', click 'Browse' to choose the zip file you downloaded from the template provider
4. Click 'Upload File & Install'. The template will now be installed.
5. Click 'Extensions' -> 'Template Manager'

6. To set the uploaded template to be the default template for the site, click the radio button to the left of the template name.
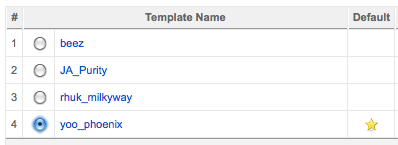
7. Click the 'Default' button in the top right corner of the page.
The template is now used as default on all pages on the site. You can now start customizing the template.
Customizing a Joomla template
I won't go into details about how to customize a template in this post. However, you can edit both the HTML of the template itself, and the CSS (stylesheets) used by the template
To access the customization options of a Joomla template, click the name of the template in the list.
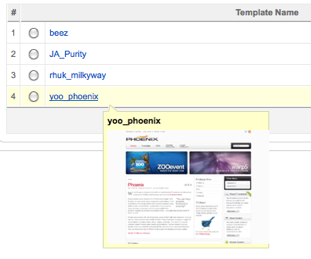
You are now presented with the options available for the particular template. There will be different options for each template, as this is something the template developer may include himself.
Some templates have just a few options, while others will present a lot of alternatives. This is oftentimes the difference between a free and a professionally developed template. Most commercial templates have a number of settings to control the width of the template and columns, how the modules are presented, different styles and a lot more.
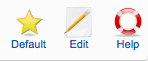
To see the code for the template and CSS, use the buttons:

I will look more into the mysteries of Joomla templates in another post.
Joomla template providers I recommend
If you're uncertain where to get quality Joomla templates, I recommend the following Joomla template providers:- JoomlaBamboo
Clean code and elegantly designed templates. - RocketTheme
Advanced framework (Gantry) with loads of functionality and third-party support. - YooTheme
Elegant and well documented templates. - JoomlaPraise
Clean and fast code. Good third-party support - YouJoomla Elegant and well documented templates.
Installing Joomla! CMS (step by step tutorial)

To install and run your first Joomla! Page You do not need some knowledge, but is still expected of you already know some basic concepts of web-dictionaries. Installation process is explained in several steps: 1st To install Joomla! CMS, you need a server that supports MySQL and PHP applications. I recommend that if you are at all able to obtain the hosting is not free because it is much more reliable and easier to work. From experience I suggest this because I know that free web hosting can demoralisati-beginners and even lead to its abandonment of web development. Free hosting servers are often (but not necessarily) unreliable, slow, problematic, but still can be used for learning ... decide for yourself. If however you choose paid hosting I recommend hosting on a Linux system with Apache server. 2nd Once you have solved the issue of hosting more than File Manager in the hosting control panel or via an FTP program (eg Filezilla) switch to Joomla! files on the server. If you switch from FTP application process will be somewhat slower. You otpakovati files on your computer and upload them via FTP programs or upload zipovani Joomla! file through File Manager or FTP program, so it otpakovati on the server (this option is not dostuna in all control panels on web hosting - means depends on the type of hosting control panel you use). 3rd After you upload Joomla! files that are now otpakovani on your web hosting needs first and foremost to create a MySQL database. To do the hosting control panel with the hosting tool that is used to manipulate MySQL databases. Create a new database under a specific name (eg baza_1). After that, create a user database (user database) which will grant all privileges to specific database management (creating a database varies from host to host, but mainly boils down to making the base allocation and the user base). Username pasword user base and select yourself and remember it will be necessary later. 4th See the folder that contains files of your Joomla! sites that we have uploadovali the server. This folder access via web brovsera by ukucate www.vašadomena.com/folderukojemsufajlovi/ After that will appear in Home Joomla! installation that looks like this:

Domov Home Joomla! Installation To properly install Joomla! CMS requires that all items are displayed on the home page are written in green except for the option "Register Globals" which need not be included. Joomla folders are usually not chmod-Iran so that they are painted red like the following picture, which means that they should be chmod-Irata the value of 777th Chmod is to be performed only on Linux hostinzima. Chmod translated into layperson's language means setting permissions for specific files, or specify the manner in which you can access a specific file but all you need to know about it is that all folders that are written in red letters above the displayed image should be chmod - Irani on the value of 777 which will do special checking each folder and clicking on the chmod option in the menu options and set the value of 777 or (depending on the control panel) to assign all responsibility for all three groups korsnika this file (read-write-execute) by checking the tick . Folders to be chmod-Irata

5th Once you have the correct chmod-Çirali folders refreshajte your home page Joomla! installation and now there would be all the items should be printed in green. You can then click on the NEXT button on the next page will appear the license under which Joomla! CMS released (GNU GPL license). After reading the license, click NEXT again in the upper right corner (if you agree with the license, of course) to access the next step of installation. 6th Now is the page where you need to enter the database name that you previously created (in our case baza_1) and enter the username and password user database that you created earlier also. The first field should be the name mysql host is Localhost most, if not so then you are probably in the mail in which you activate the hosting indicated MySQL host name that you enter in this field. The last field is the prefix specified database (jos_) which should change ... or the other, below the indicated options. After you have successfully entered all the data, click Next and click the OK button to confirm that your data you have entered correct - if all of the office you will be transferred to the next page of installation. 7th Next page offers you the option election, the names of sites you can later change (not necessarily in this field, enter the name of your domain, but that you can put anything). 8th The next step is the penultimate page where you enter your pasword (or write, but offered) and enter your e-mail address to which you can later recover potentially lost pasword. The URL field and the PATH is usually not necessary to touch because it is automatically generated and filled. 9th Once you have correctly completed the eighth step, the last page of the installation appears you your user name (default username is "admin") and your password that you selected, or if you have not changed, automatically generated pasword. And remember information because you will be required to access the admin panel after installation. On the last page of the installation can also find a warning that it is necessary to delete the installation folder, and immediately do Filemanager distress. (INSTALLATION file is the Joomla! Files) After you delete the INSTALLATION file, access the folder that contains files Joomla! CMS via browser (www.vašadomena.com/folderukojemjejoomla/) and if you have done all that you will appear to be freshly installed Joomla! CMS and admin panel can be accessed via the options menu under ADMINISTRATOR where he needed to enter the pasword that you write at the end of the installation and the username "admin"

Subscribe to:
Posts (Atom)